Google謹製のFlutterの使い方(2)

前回はFlutterの開発環境を構築するまでを記事にしました。
今回はアプリを開発する上で、簡単なTipsなどを記載していきます。
まだFlutterの導入がお済みでない方は コチラ の記事からどうぞ。
コンソールにログを出力したい
開発に必要なコンソールへのログ出力は下記のような感じです。
|
1 2 3 4 5 6 |
// テキストを出力 print("ログ出力"); // 変数と一緒に出力 print('値: $_value'); |
右上のDEBUGを消したい
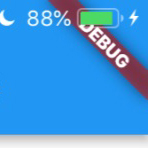
Flutterでは、プロジェクトを作成すると、アプリ右上に DEBUG という帯が表示されてしまいます。
こちらは、下記のようなコマンドで消すことが可能です。
|
1 2 3 4 5 6 7 8 9 |
class MyApp extends StatelessWidget { @override Widget build(BuildContext context) { return MaterialApp( debugShowCheckedModeBanner: false, // 右上のDEBUGを消す title: 'Flutter Demo', theme: new ThemeData( |
ナビゲーションバーにアイコンボタンをつけたい
ナビゲーションバーにアイコンボタンを追加するには、下記のようにします。
|
1 2 3 4 5 6 7 8 9 10 11 12 13 14 15 16 17 18 19 20 21 22 23 24 25 26 |
class _MyHomePageState extends State { int _counter = 0; void _incrementCounter() { setState(() { _counter++; }); } @override Widget build(BuildContext context) { return Scaffold( appBar: AppBar( // タイトルを中央寄せにする centerTitle: true, title: Text(widget.title), // アイコンボタンを追加する actions: [ IconButton(icon: Icon(Icons.drive_eta), onPressed: (){ print("IconButton 1"); }), IconButton(icon: Icon(Icons.directions_bike), onPressed: (){ print("IconButton 2"); }), ], ), |
また、ナビゲーションボタンにアイコンを追加すると、タイトルが自動で左寄せになります。
タイトルの位置を中央寄せ・左寄せにする場合、上記にある「centerTitle」のパラメータを変更することで可能です。
新規画面を追加し、画面遷移をしたい
画面遷移は下記のようにします。
まず、遷移後の画面を作成するため、dartファイルを作成します。
(例: screen/sub.dart を作成)
sub.dart の内容は下記のような感じにします。
|
1 2 3 4 5 6 7 8 9 10 11 12 13 14 15 16 17 18 19 20 21 22 23 24 |
import 'package:flutter/material.dart'; class SubScreen extends StatelessWidget { @override Widget build(BuildContext context) { return Scaffold( appBar: AppBar( title: Text("Sub View"), centerTitle: false, ), body: Center( child: RaisedButton( onPressed: () { print("Press Raised Button."); // 画面戻る Navigator.pop(context, true); }, child: Text("Go back!"), ) ), ); } } |
次に main.dart に sub.dartを読み込む処理を記載し、ボタン押下などのイベント時に、遷移する処理を記載します。
|
1 2 3 4 5 6 7 8 9 10 |
// Screen import 'package:[プロジェクト名に置き換えてください]/screen/sub.dart'; ... 省略 ... // 次画面に遷移 Navigator.push( context, MaterialPageRoute(builder: (context) => SubScreen()) ); |
これで main.dart と sub.dart を行き来する画面遷移が完成します。
テキストのスタイルを変更したい
テキストのスタイルを変更するには下記のようになります。
|
1 2 3 4 5 6 7 8 9 10 11 12 13 14 15 16 17 18 |
Text( 'テキスト', style: Theme.of(context).textTheme.display4, // style: Theme.of(context).textTheme.display3, // style: Theme.of(context).textTheme.display2, // style: Theme.of(context).textTheme.display1, // style: Theme.of(context).textTheme.headline, // style: Theme.of(context).textTheme.title, // style: Theme.of(context).textTheme.subhead, // style: Theme.of(context).textTheme.body2, // style: Theme.of(context).textTheme.body1, // style: Theme.of(context).textTheme.caption, // style: Theme.of(context).textTheme.button, // style: Theme.of(context).textTheme.subtitle, // style: Theme.of(context).textTheme.overline, ), |
記事作成時点でデフォルトでは13種類存在しているみたいです。
また、カスタムスタイルを適用することも可能です。
|
1 2 3 4 5 6 7 8 9 10 11 12 13 14 15 16 17 18 19 20 21 22 23 24 25 26 27 |
Text( 'だからよぉ 止まるんじゃねぇぞ・・・・。', style: TextStyle( // テキストカラーを変更 color: Colors.purple, // 単語のスペース幅を変更 wordSpacing: 10, // フォントをイタリックにする fontStyle: FontStyle.italic, // フォントサイズを変更(デフォルト: 14) fontSize: 18, // テキストに下線をひく decoration: TextDecoration.underline, // テキストデコレーションの色を変更 decorationColor: Colors.orange, // テキストデコレーションをスタイルを変更 decorationStyle: TextDecorationStyle.dashed, // テキストに影をつける shadows: [Shadow( color: Colors.black, offset: Offset(2, 2), blurRadius: 5, )], ), ), |
その他
その他、詳細については コチラ の公式ドキュメントからご覧になれます。
- おすすめ記事
-
-
ノウハウ
 2018.12.20
 のえる
のえる
-
POPULAR
のえる
Full-stack Developer


